

For several reasons, you may need to install a new template on your blogger blog. But few of the many reasons that may make you want to install a new template on your blogger blog include;
- When a newer version of the template installed on your blog is available and you wish to update your blogger template to the latest available version.
- If you feel the template which is already installed on your blog does not satisfy your taste or needs.
- You could probably just feel like switching your blogger template to a more slicker and SEO-friendlier blogger template.
Whatever your reasons, in this tutorial, I walk you through the step by step processes involved in installing a new blogger template on your blog.
But before I go into the details, let me briefly surprise you with a few hints.
Do you know?
To install Blogger template on Blogger website or blog, you have two options which are:
- Clean Template Installation
- Rough Template Installation
Clean Template Installation
This is the installation method recommended for when you are installing an entirely different template on your Blogger website or blog. E.g when installing iVMega Premium Blogger template on a blog that has iVFlattened Blogger template installed already.
Rough Template Installation
Rough template installation is used when you are simply upgrading your blogger website template. E.g when attempting to install iVMega Pro Blogger template v1.2.3 on a Blogger website that already has iVMega Pro Blogger template v1.2.0 installed on it.
Okay? Now you know!
So, how can you install a new blogger template on your blog?
Good. I would take this one after the other.
First, I would discuss the step by step guide involved in performing a fresh installation which is also being regarded as clean installation of blogger template on your blog.
How to Install Blogger Template on Blogger Blog
-
Secure A Blogger Template of your Choice
The first thing you need to do is to secure a blogger template of your choice. Either it is a free blogger template or paid premium blogger template, simply download it and get it ready.
-
Extract your Copy of the Template
Most blogger template are compressed in
.zip,.raror.7zipfile format. In any case, ensure you extract or decompress your copy of the template using supported file extractor such as winRar, WinZip or 7zip file extractor such that you now have your Bloggertemplate.xmlfile format in a folder on your PC or phone; whichever you have decided to use for this operation. -
Login your Blogger Account
If you are yet logged in, login your Blogger account by visiting blogger.com and sign in using your appropriate Google account credentials thus; your correct username and password.
-
Select the Blog you Wish to Install the Template On
If you have several blogs under a single Google account, Blogger may not display the actual blog on whose you wish to install the template. If that is the case, simply click on the name of the blog on the display. Clicking that would display a list of blogs associated with your Google account in a drop-down menu.
Select the blog on whose you wish to install the template and then proceed.
-
Backup Your Current Blogger Template
Because the procedures discussed here involves modifying your blogger blog source codes, it is highly recommended that you make a full backup of your blogger template before you proceed.
To backup your blogger blog theme, see here: how to backup your blogger template for illustrated instructions on how to make a full backup of your Blogger template.
-
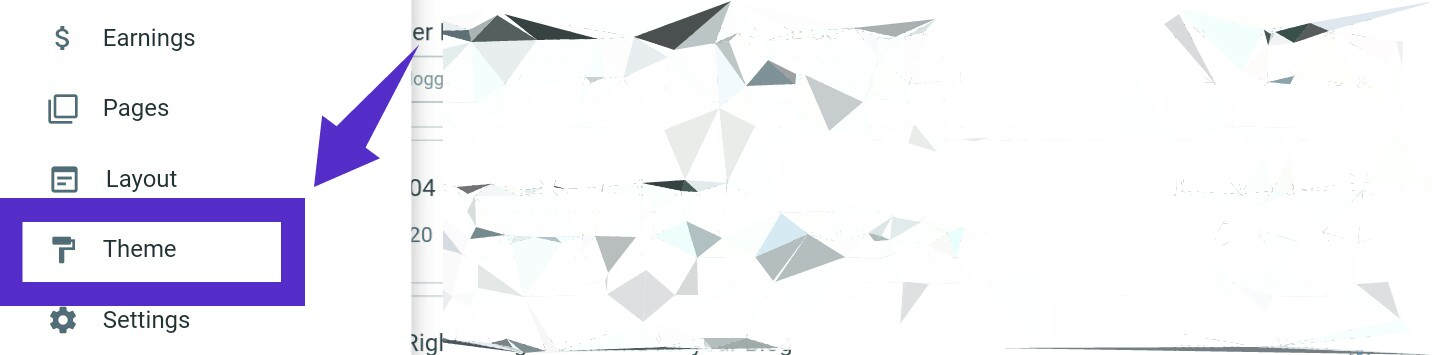
Click Theme from the Blogger Main Menu
After a backup of your current Blogger template has been made, from Blogger Dashboard go to theme formarly known as template and click it. You can locate the theme from the Blogger Main Menu left of your Blogger Dashboard.
-
View the Source Codes of your Blogger Blog
From the page that opens, click the radio button that has an icon pointing downward in it just in front of CUSTOMIZE. Clicking that will drop-down a list of links. And from there, click Edit HTML. After a few seconds or minutes, depending on your device speed and your internet connection, a page should be displayed revealing a whole lots of codes.
-
Delete or Wipe the Entire Source Codes
Now, click anywhere inside the whole lots of codes, then press
CTRL + Ato select all the contents in the codes area and click the Delete or Backspace key - this will delete or wipe the entire contents of the template's source codes clean. -
Copy the New Template Source Codes
Now, go to the folder where you have extracted the new template you wish to install on your blog. In the folder, locate the
template.xmlfile and open it using your favourite text editor. For Windows PCs, I recommend NotePad++ and for Android, Acode is recommended.Once the
template.xmlfile is opened in your text editor, pressCTRL + Ato select all the contents of the new template and then pressCTRL + Cto copy the entire selected contents. -
Paste the New Template Contents
Now, go back to the step 8. Again, click on the now empty space where you have previously deleted the entire contents of the previous template then press
CTRL + Von your keyboard or keypad. - this will paste the entire contents of the new template which was copied in step 9 just above. -
Preview your Blog
Now, preview your blog on the template. This is a necessary step to take as it allows you know if the new template actually gives your blog the look you want. It also lets you know if everything works fine before you save it.
To preview your blog on the new template, simply locate the Preview button and click it.
-
Save your New Template
After previewing your blog on the template and you are satisfied with the look and everything else, locate the SAVEbutton and click it.
-
Congrats. You Now Have A New Template Installed
Congratulations! You have just installed a new template on your Blogger blog.


NOTE:
The illustrated instructions given above is for when performing a clean Template Installation. Hope you still remember what that means, Right?
In case you have forgotten, that is the recommended installation method for when installing another template on Blogger website already running on a different template.
How to Perform Rough Installation of Blogger Template on Blogger Blog
-
Secure A Blogger Template of your Choice
The first thing you need to do is to secure a blogger template of your choice. Either it is a free blogger template or paid premium blogger template, simply download it and get it ready.
-
Extract your Copy of the Template
Most blogger template are compressed in
.zip,.raror.7zipfile format. In any case, ensure you extract or decompress your copy of the template using supported file extractor such as winRar, WinZip or 7zip file extractor such that you now have your Bloggertemplate.xmlfile format in a folder on your PC or phone; whichever you have decided to use for this operation. -
Login your Blogger Account
If you are yet logged in, login your Blogger account by visiting blogger.com and sign in using your appropriate Google account credentials thus; your correct username and password.
-
Select the Blog you Wish to Install the Template On
If you have several blogs under a single Google account, Blogger may not display the actual blog on whose you wish to install the template. If that is the case, simply click on the name of the blog on the display. Clicking that would display a list of blogs associated with your Google account in a drop-down menu.
Select the blog on whose you wish to install the template and then proceed.
-
Backup Your Current Blogger Template
Because the procedures discussed here involves modifying your blogger blog source codes, it is highly recommended that you make a full backup of your blogger template before you proceed.
To backup your blogger blog theme, see here: how to backup your blogger template for illustrated instructions on how to make a full backup of your Blogger template.
-
Click Theme from the Blogger Main Menu
After a backup of your current Blogger template has been made, from Blogger Dashboard go to theme formarly known as template and click it. You can locate the theme from the Blogger Main Menu left of your Blogger Dashboard.
-
Click Restore from the Drop-down Menu
From the page that opens, click the radio button that has an icon pointing downward in it just in front of CUSTOMIZE. Clicking that will drop-down a list of links. And from there, click Restore. Shortly afterwards, a pop up box that allows you browse your system folders should appear.
-
Select the Template you Wish to Restore to
Now, click the browse button and navigate to the folder where you have extracted or saved the new template you wish to restore to and select the
template.xmlfile. -
Wait Patiently While Blogger Restores the Template
Once your desired template is selected, Blogger would automatically restore your blog template to the one selected from the step 8 just above.
After a few minutes, usually around two minutes or much less depending on your device and internet connection speeds, the restoration process should complete and a pop-up message notifying of such should appear.
-
Congrats. You Now Have A New or Updated Template Installed
Congratulations! You have just installed a new, outdated or updated template on your Blogger blog.


NOTE:
The illustrated instructions given above is for when performing a Rough Template Installation.
Thus; installation method recommended for when installing the same template, lower or updated version on a Blogger website already running on that same template.
Got Some Questions?
As you may have noticed, using the best methods known to me and in the simplest vocabularies I know of, I have presented these step by step tutorials. However, if there are some areas you could not get to work or others you need help at, simply use the comments box below. Myself or one of my colleagues shall attend to your comments and provide answers to your every questions or assist you further.
0 Comments